Here’s a situation that happens to EV owners more often than any charging guide prepares them for.
It’s 6:45am. You’re leaving for work in fifteen minutes. You go to the garage, disconnect your EV from the home charger, and see 31% on the dashboard. The car should be at 80%. You plug in last night at 8pm. The charger’s indicator light shows red — or amber — or is doing something it hasn’t done before. The car says “charging interrupted.” The charger’s app shows an error code you’ve never seen.
You have fifteen minutes.
Most EV charging troubleshooting guides exist in one of two useless extremes. Either they’re so vague — “check all connections and restart the charger” — that they help nobody, or they’re so deeply technical that a layperson can’t follow them. Neither serves the EV owner who needs to diagnose and fix a specific fault in a specific timeframe.
This guide on troubleshooting home EV chargers common fixes for US and European models takes a different approach. It is organised by symptom — what you observe — rather than by brand or by electrical theory. For each symptom, it provides specific diagnostic steps and specific fixes in priority order, with honest assessments of which fixes you can do yourself and which require professional intervention.
It covers every major US and European home EV charger: ChargePoint Home Flex, Emporia Pro, Tesla Wall Connector, Grizzl-E, JuiceBox (US); Wallbox Pulsar Plus, Myenergi Zappi, Hypervolt Home 3 Pro, Easee One, Ohme Home Pro (UK/Europe). Where fixes are brand-specific, they’re labelled. Where fixes are universal, they apply to all.
Before You Start — The Three-Minute First Response
When your EV charger isn’t working as expected, three steps should happen before any specific diagnosis:
Step 1: Read the Indicator Light
Every home EV charger uses indicator lights to communicate status. The colours and patterns vary by brand but the categories are consistent:
Solid green / solid blue: Charging normally. If your car shows low charge despite this, the problem may be with the car rather than the charger.
Pulsing/flashing green: Charging in progress — normal.
Solid amber / orange: Standby or scheduled charging waiting. Normal if you have TOU scheduling set.
Flashing amber: Warning state — the charger is operational but something requires attention. Usually a communication issue between charger and vehicle.
Solid red: Fault state — the charger has detected an error and stopped charging.
Flashing red: Active fault requiring attention — the charger will not charge until the fault is resolved.
No light: Power issue — the charger is not receiving electrical power.
Step 2: Check the Charger App
Open your charger’s app before touching anything on the hardware. Modern smart chargers transmit fault codes to their apps in real time — the app often provides a specific error description that narrows diagnosis immediately.
For each major brand:
- ChargePoint: ChargePoint app → Home → Status
- Emporia Pro: Emporia app → Charger → Status/Alerts
- Tesla Wall Connector: Tesla app → Charging → Charger Status
- Wallbox: Wallbox app → My Chargers → Status
- Myenergi Zappi: Myenergi app → Zappi → Status
- Hypervolt: Hypervolt app → Charger → Diagnostics
- Ohme Home Pro: Ohme app → Charger Status
If the app shows no error but the charger shows a fault indicator: The charger has lost WiFi connectivity — the app can’t communicate with it. This is itself a diagnostic indicator.
Step 3: Perform the Universal Reset
Before deeper diagnosis, a controlled restart resolves approximately 30% of reported home EV charger faults — firmware glitches, temporary communication errors between charger and vehicle, and transient network issues.
Universal reset procedure:
- Unplug the vehicle from the charger
- Wait 30 seconds (this is important — it allows capacitors to discharge and the charger’s processor to fully reset)
- Plug the vehicle back into the charger
- Wait 60 seconds for the charging session to initialise
- Check indicator light and app status
If charging initiates normally after this reset: the fault was a transient communication error — no further action needed.
If the fault persists after the reset: proceed to specific diagnosis below.
Symptom 1: Charger Not Starting — Vehicle Plugged In but No Charging Initiated
This is the most common troubleshooting scenario. The connector is physically plugged in, the car acknowledges the connection, but charging does not begin.
Diagnosis Path A: Scheduled Charging Is Active
What this looks like: Charger shows amber/standby light. Car shows “scheduled” or “charging delayed.”
Cause: Your TOU scheduling is set to charge during a specific window (overnight off-peak) and you’ve plugged in outside that window.
Fix: Check your charger app for active scheduling. Either wait for the scheduled window, or use the “charge now” override in the app.
Brand-specific override:
- ChargePoint: App → Home → Override Schedule → Charge Now
- Emporia Pro: App → Charger → Start Charge (overrides schedule)
- Tesla Wall Connector: Tesla app → Charging → Start Charging (or set departure time to immediately)
- Wallbox: App → Charge Now
- Myenergi Zappi: Press the boost button on the charger unit itself (3-second press) to force immediate Fast mode charging regardless of schedule
- Ohme Home Pro: App → Override → Charge Now
Prevention: Configure your charger app’s emergency override setting — most smart chargers allow setting a minimum SOC threshold below which charging starts immediately regardless of schedule. Setting this to 20% prevents low-battery overnight sits.
Diagnosis Path B: Vehicle Communication Error (EVSE Handshake Failure)
What this looks like: Charger amber or flashing light. Car acknowledges connection briefly then shows “charging stopped” or “not charging.”
Cause: The communication protocol between the charger (EVSE) and the vehicle (pilot signal) has failed to establish. This happens with:
- Connector not fully inserted (most common)
- Connector contact contamination
- Temporary pilot signal glitch
- Vehicle-side inlet issue
Fix sequence:
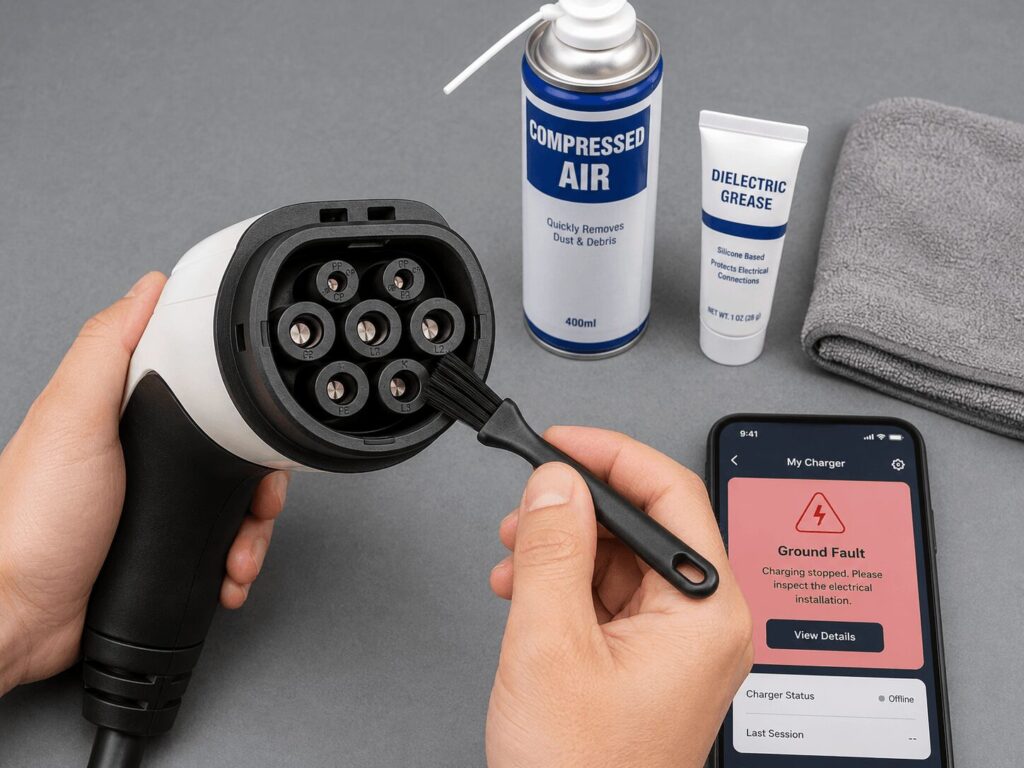
- Fully remove the connector — not just a tug, but a complete removal with the locking button fully pressed
- Inspect the connector contacts — look for debris, moisture, or corrosion on the Type 2/J1772/NACS pins
- Clean if necessary — dry soft brush, compressed air, dielectric grease on contacts
- Inspect the vehicle inlet — ensure no debris in the vehicle’s charging port
- Reinsert firmly — push until you hear/feel the mechanical lock engage
- Wait 90 seconds — the EVSE handshake protocol takes up to 60 seconds in some configurations
If this doesn’t resolve:
- Try charging the same vehicle with a different charger (if available) — if it charges normally, the fault is with your home charger
- Try charging a different vehicle with your home charger (if available) — if it charges normally, the fault is with your vehicle’s inlet
Brand-specific note for Myenergi Zappi: The Zappi’s Eco and Eco+ modes will not charge if no solar surplus is detected. If you’ve inadvertently switched to Eco+ mode, the car appears plugged in but charging doesn’t start because there’s no solar surplus to draw from. Fix: Press the mode button to switch to Fast mode, which charges from the grid immediately.
Diagnosis Path C: Ground Fault / Earth Fault Detection
What this looks like: Red fault light. App shows “ground fault,” “earth fault,” “GFCI fault,” or “RCD fault.”
Cause: The charger has detected a ground fault — a difference in current between the live and neutral conductors that suggests current is flowing somewhere it shouldn’t. This is a safety protection feature and should be taken seriously.
Immediate action: Do NOT attempt to force charging. A genuine ground fault indicates either:
- A fault in the charger’s electronics
- A fault in the vehicle’s charging system
- A wiring fault in the installation
- Water ingress into the charger or connector
Safe diagnostic steps:
- Unplug the vehicle immediately
- Inspect the connector and vehicle inlet for moisture — after rain, ice, or washing the car
- Allow to dry completely (minimum 2 hours in warm conditions) then retry
- If fault persists without vehicle connected: The fault is in the charger or installation, not the vehicle. Contact manufacturer support or a licensed electrician
- If fault only appears when vehicle is connected: The fault may be in the vehicle’s onboard charger. Try the vehicle at a public Level 2 charger — if it charges normally there, the fault is specific to the interaction between your home charger and your vehicle
UK-specific note: UK home EV chargers require a Type B RCD for ground fault protection — this handles both AC and DC fault currents. If your installation has an older Type A RCD, DC fault currents from the vehicle’s onboard charger can cause nuisance tripping. Solution: Upgrade to Type B RCD — a licensed electrician job.
US-specific note: NEC requires GFCI protection for EV charger circuits. A tripping GFCI indicates the same conditions as above. If the GFCI trips consistently but no moisture or wiring fault is apparent, the vehicle’s onboard charger may be the source — test at a public GFCI-protected Level 2 charger to confirm.
Diagnosis Path D: Power Supply Not Reaching Charger
What this looks like: No indicator lights at all. App shows charger offline.
Cause: The charger is not receiving electrical power.
Fix sequence:
- Check the circuit breaker for the EV charger circuit — located in your main electrical panel. If tripped, it will be in the middle position (US) or will have moved noticeably from its normal on position (UK). Reset by switching fully off then fully on.
- If the breaker trips immediately on reset: A persistent breaker trip indicates either a short circuit in the wiring, a fault in the charger’s internal electronics, or an overloaded circuit. Do NOT keep resetting — call a licensed electrician.
- If the breaker hasn’t tripped: Check whether the NEMA 14-50 outlet (if plug-in EVSE installation) has power using a simple outlet tester ($10-$15 at any hardware store). If the outlet has no power, the issue is upstream in the wiring or panel.
- For hardwired chargers with no outlet to test: Have an electrician verify supply voltage at the charger’s connection point.
Symptom 2: Charger Stops Mid-Session
Charging initiates normally then stops before reaching the target SOC. This is the symptom that most commonly causes the 6:45am discovery problem described in this guide’s opening.
Diagnosis Path A: Scheduled Charging Window Ended
Cause: Your TOU schedule was set to charge from 11:30pm to 5:30am (Octopus Go window). If the vehicle wasn’t at target SOC by 5:30am, charging stopped.
Fix: Check your scheduled window. Adjust start time earlier (plug in earlier, configure schedule to start earlier) or allow longer charging window. For Octopus Agile users, the dynamic scheduling sometimes underestimates time needed.
For Myenergi Zappi on Octopus Go: Zappi’s Octopus API integration schedules based on estimated energy needed. If your vehicle arrived home with lower battery than the Zappi estimated (longer drive than usual), the charging window may be insufficient. Solution: Use the Boost function to override and continue charging after the scheduled window.
Diagnosis Path B: Vehicle Reached Maximum Charge Limit
Cause: Your vehicle’s app has a maximum charge limit set (usually 80% for daily use). When this limit is reached, the car stops accepting charge — and the charger correctly reports this as session complete.
This is working correctly — not a fault. If you need higher than 80% for a longer drive, adjust the limit in your car’s app before plugging in.
Vehicle-specific charge limit adjustment:
- Tesla: Tesla app → Charging → Set Limit slider
- VW ID series: myVolkswagen app → Charging → Charging settings → Maximum charge level
- Hyundai Ioniq series: Bluelink app → Climate/Charge → Charging limit
- Ford Mach-E / F-150 Lightning: FordPass app → Charge settings → Charge level
- Renault 5: My Renault app → Charge settings → Charge level
Diagnosis Path C: Thermal Protection (Overtemperature Cutout)
What this looks like: Charger stops mid-session in summer or in a warm garage. App may show “overtemperature” or “thermal protection.” Unit may feel warm to touch.
Cause: The charger’s internal temperature has exceeded the thermal protection threshold — typically 60-70°C for most home chargers. This occurs in:
- Enclosed, unventilated garages in summer heat
- Direct sunlight on outdoor-mounted chargers
- Chargers installed close to heat sources
- High ambient temperatures combined with maximum-rate charging over several hours
Fix sequence:
- Allow the charger to cool — typically 20-30 minutes before automatic restart
- Improve ventilation around the charger if possible — ensure no debris blocking ventilation slots
- Shade the charger if direct sunlight is a contributing factor — a simple roof overhang or shade panel above the unit
- Reduce charging speed in sustained hot weather — most smart chargers allow you to set a lower maximum amperage that generates less heat. At 32A rather than 48A, heat generation reduces proportionally.
Brand-specific thermal behaviour:
- ChargePoint Home Flex: Automatically reduces amperage before thermal cutout — you may notice charging speed reducing on hot days
- Emporia Pro: Similar automatic thermal management
- Grizzl-E Ultimate: Less thermal protection concern due to aluminium enclosure dissipating heat better than polycarbonate alternatives
- Wallbox Pulsar Plus: App shows temperature warning before cutout — visible in diagnostic view
Diagnosis Path D: WiFi Disconnect Causing Schedule Loss
Cause: Smart charger lost WiFi connectivity during the charging session. The scheduled charging session — managed by the cloud — couldn’t communicate stop/continue instructions. On some chargers this causes immediate session termination.
Fix sequence:
- Check WiFi connectivity — is the charger’s indicator light showing normal WiFi status?
- Check whether your router had an outage overnight — most routers log connection events
- Confirm charger offline mode — most chargers should continue a charging session even if WiFi drops. If yours terminates on WiFi loss, this is a firmware issue to report to the manufacturer
- Improve WiFi signal if signal strength is marginal — a WiFi extender positioned near the garage
For Myenergi Zappi specifically: The Zappi communicates through the Myenergi hub rather than directly to your router. If the hub loses connectivity, scheduled charging through the Octopus API will stop being optimised — but manual Fast mode charging will continue. If Octopus-scheduled charging stops unexpectedly, check hub connectivity first.
Diagnosis Path E: Vehicle-Side Charging Fault
Cause: The vehicle’s onboard charger has detected a fault and commanded the EVSE to stop — a legitimate safety response from the vehicle rather than the charger.
How to identify: If you try the same vehicle at a public Level 2 charger and it stops at the same point or shows a charging fault, the fault is in the vehicle — not the home charger.
Action: This requires vehicle diagnostics — contact the vehicle manufacturer or dealer rather than attempting to fix the home charger.
Symptom 3: Charging Slower Than Expected
The charger is charging but at significantly lower power than the specification suggests — the car is adding range at half or a third of the expected rate.
Diagnosis Path A: Charger Amperage Set Incorrectly
What this looks like: Emporia Pro or ChargePoint Home Flex charging at 16A when you expected 48A. Grizzl-E charging at 24A.
Cause: The amperage setting was changed — either by accident, by a previous user, or by an automatic DIP switch adjustment.
Fix:
- ChargePoint Home Flex: App → Charging Speed → Adjust to maximum appropriate for your circuit
- Emporia Pro: App → Charger Settings → Max Amperage → Set to 48A (or circuit maximum)
- Grizzl-E Classic: DIP switches on the internal board — requires opening the enclosure (power off first). Consult the manual for switch configuration for 40A
- Grizzl-E Smart/Ultimate: App → Charger → Max Charging Rate → Set to maximum
Diagnosis Path B: Vehicle Accepting Less Than Maximum AC Rate
Cause: Your vehicle’s onboard charger is limiting input — not the home charger. This happens when:
- The vehicle’s battery is cold (below 10°C) — BMS limits AC acceptance until battery warms
- The vehicle’s battery is above 80% SOC — charging naturally slows above 80%
- The vehicle’s battery management system is in a temporary protection mode
Diagnosis: Check the charging rate in your car’s app or dashboard display. If it shows lower than the expected rate despite the home charger being set correctly, the vehicle is limiting.
For cold battery limiting: Allow the vehicle to warm through normal driving before expecting full charging rates. Pre-conditioning while plugged in warms the battery from grid electricity and resolves this faster than passive warming.
For above 80% SOC limiting: Normal and expected. Above 80%, charging deliberately slows to protect battery longevity. This is correct behaviour.
Diagnosis Path C: Supply Voltage Drop
Cause: Rural electrical supplies or long wiring runs can experience voltage drop below the charger’s optimal operating range. At 210V instead of 230V (European), or 220V instead of 240V (US), charging power reduces proportionally.
Diagnosis:
US: Use a plug-in outlet tester with voltage display on your NEMA 14-50 outlet. Below 230V indicates supply voltage issues.
UK/Europe: A simple socket tester with voltage reading, or ask your electrician to measure supply voltage at the charger’s connection point.
If supply voltage is consistently below rated levels:
- Contact your distribution network operator (DNO in UK, local utility in US/Europe) — sustained under-voltage on a residential supply is a utility issue, not a homeowner problem to solve
- A qualified electrician can measure voltage drop at different points to identify whether the issue is in the utility supply or in your home’s wiring
Diagnosis Path D: Load Management Throttling
Cause: Your charger’s load management (Emporia Pro + Vue, Hypervolt with CT clamp, Easee with Equalizer) has detected high home electricity consumption and reduced EV charging to prevent panel overload.
This is working correctly — not a fault. If you want higher charging speed, either:
- Reduce other electrical loads (switch off HVAC boost, wait for dishwasher cycle to complete)
- Check the load management thresholds in the app — if the maximum total load threshold is set too conservatively, you can increase it (ensure the new threshold is within your panel’s safe capacity)
For Emporia Pro + Vue users: The Vue dashboard shows real-time home consumption and EV charging draw. This view immediately shows whether load management is actively throttling your charger.
Symptom 4: WiFi Connectivity and App Problems
Smart charger WiFi issues are the most frequently reported category of home EV charger problems — because they don’t prevent charging but they prevent smart features from working, which is often why buyers paid the smart charger premium.
Diagnosis Path A: Charger Shows Offline in App
Cause: The charger has lost WiFi connectivity with your home network.
Fix sequence:
- Confirm WiFi is working — check another device on the same network in the same physical area as the charger
- Check charger indicator light — most chargers show a specific WiFi-disconnected status through LED behaviour (consult your manual for the specific pattern)
- Attempt reconnection through the app:
- ChargePoint: App → Home → Reconnect / Forget and Re-Add
- Emporia Pro: App → Devices → Add Device → Follow pairing instructions
- Wallbox: App → My Chargers → Configure WiFi → Select Network
- Myenergi Zappi: Myenergi app → Hub Settings → WiFi → Reconnect (note: Zappi connects through the hub, not directly)
- Ohme Home Pro: App → Charger → Settings → WiFi Configuration
- If reconnection fails through the app: Perform a WiFi reset directly on the unit:
- Wallbox Pulsar Plus: Hold the button on the charger for 10 seconds until LED flashes rapidly. Enter pairing mode and reconnect through app
- ChargePoint Home Flex: Hold pairing button for 5 seconds — LED flashes amber to indicate pairing mode
- Emporia Pro: Press and hold the button on the unit for 10 seconds — unit enters setup mode
- Grizzl-E Smart: Hold WiFi button for 10 seconds — unit resets WiFi settings
- If the charger repeatedly loses WiFi after reconnecting:
Common causes of repeated disconnection:
- Router firmware update changed WiFi security settings (WPA2 → WPA3 transition causes issues for some charger WiFi modules)
- Router replaced — charger remembers old SSID/password
- Channel congestion in 2.4 GHz band in dense urban environments
- Signal strength too low at charger location
Solutions:
- Check router security settings — ensure WPA2 compatibility is enabled (some chargers cannot connect to WPA3-only networks)
- If router replaced: Reconnect charger to new network credentials
- WiFi extender if signal strength is marginal — check signal strength with a smartphone at the charger location. Below -75 dBm is marginal for reliable charger connectivity
- 2.4 GHz band selection: Ensure charger is connecting to 2.4 GHz rather than 5 GHz — most home EV chargers only support 2.4 GHz
Myenergi Zappi-specific WiFi note: The Zappi doesn’t connect directly to your WiFi — it connects to the Myenergi hub, which connects to your router. Troubleshoot hub connectivity rather than Zappi connectivity directly. The hub can be connected via ethernet cable rather than WiFi for more stable connectivity — the most reliable Myenergi setup for problematic WiFi environments.
Diagnosis Path B: App Shows Connected but Features Not Working
Cause: The charger has WiFi connectivity but cloud backend communication is failing. This typically occurs when:
- Manufacturer’s cloud service is experiencing downtime
- App update has broken compatibility
- Account credentials need refreshing
Fix sequence:
- Check manufacturer’s service status:
- ChargePoint: status.chargepoint.com
- Wallbox: Check Wallbox’s official social media for service announcements
- Myenergi: Check myenergi.com/support for service status
- Force app refresh: Close the app completely (not just minimise), wait 30 seconds, reopen
- Log out and back in: In the app settings, log out of your account, wait 60 seconds, log back in
- Update the app: Outdated app versions occasionally lose compatibility with updated backend services — check for pending app updates in the App Store or Google Play
- If specific features fail after an app or firmware update: Report to the manufacturer — this is often a known bug that the manufacturer is aware of and actively fixing. Providing specific details (what feature, what behaviour, app version, firmware version) helps resolution
Symptom 5: Circuit Breaker Tripping During EV Charging
The breaker for your EV charger circuit trips during a charging session — either immediately on connecting or during the session.
Diagnosis Path A: Coincident High Home Loads (Most Common)
Cause: EV charging load combined with other high-draw appliances has exceeded the breaker’s safe continuous current rating.
This is the load balancing issue covered in detail in our load balancing EV chargers guide. The short-term fix:
- Identify what other loads were running when the breaker tripped — HVAC, dishwasher, tumble dryer, oven, electric water heater
- Reduce charging amperage in the charger app to leave more headroom for other loads
- Schedule charging during low-load hours — overnight when HVAC, cooking, and laundry are unlikely to run simultaneously
For permanent resolution: Install load management (Emporia Pro + Vue in US, CT clamp load management in Europe) that automatically prevents the combined load from tripping the breaker.
Diagnosis Path B: Charger Demanding More Than Circuit Capacity
Cause: The charger is set to an amperage exceeding the circuit breaker’s capacity. An Emporia Pro set to 48A on a 40A circuit will trip the breaker.
Fix: Set the charger’s maximum amperage to 80% of the circuit breaker rating:
- 50A breaker: set charger to 40A maximum
- 40A breaker: set charger to 32A maximum
- 30A breaker: set charger to 24A maximum
Diagnosis Path C: Nuisance Tripping from EV Harmonics
Cause: The vehicle’s onboard charger creates harmonic currents during charging that can cause nuisance tripping in sensitive circuit breakers.
UK-specific: Type AC or Type A RCDs are sensitive to DC fault currents that EV chargers produce. Replacing with a Type B RCD resolves persistent nuisance tripping in UK installations — a licensed electrician job.
US-specific: Some older GFCI breakers are sensitive to harmonic currents from certain EV onboard chargers. Replacing with a current-generation GFCI breaker designed for EV charging resolves this.
Diagnosis Path D: Failing Circuit Breaker
Cause: A circuit breaker that trips immediately on reset or trips at loads well below its rated capacity is itself failing. Circuit breakers are electrical devices with finite lifespans — typically 15-25 years.
Diagnosis: If the breaker trips at loads significantly below its rated capacity and no fault exists in the charger or wiring, the breaker itself may be at end-of-life.
Fix: Breaker replacement — licensed electrician job. A licensed electrician should verify this diagnosis before replacement since the underlying cause (wiring fault, charger fault) needs elimination.
Symptom 6: Error Codes — Brand-Specific Guide
ChargePoint Home Flex Error Codes
| Code | Meaning | Fix |
|---|---|---|
| E1 | Communication error between charger and ChargePoint network | Check WiFi connectivity, force app refresh |
| E2 | Ground fault detected | Unplug vehicle, inspect connector, check for moisture, call electrician if persists |
| E3 | Over/under voltage on supply | Check supply voltage, contact utility if supply is consistently out of range |
| E4 | Overcurrent detected | Reduce amperage setting, check circuit breaker rating |
| E6 | GFCI fault | Same as E2 — ground fault. Unplug, check moisture, electrician if persists |
| E7 | Pilot signal error | Unplug/replug vehicle, clean connector contacts |
| F1 | Temperature fault | Allow to cool, check ventilation |
Emporia Pro Error Indicators
The Emporia Pro communicates primarily through the app rather than error codes on the unit. App error states include:
| App Status | Meaning | Fix |
|---|---|---|
| Offline | WiFi connectivity lost | Reconnect through app WiFi settings |
| Ground Fault | Ground fault detected | Unplug vehicle, check for moisture |
| Overcurrent | Current exceeding safe limit | Reduce max amperage in app |
| Vue Disconnected | Energy monitor lost connectivity | Check Vue unit WiFi, restart Vue |
| Session Failed | Charging session couldn’t complete | Unplug/replug vehicle, check vehicle charging settings |
Tesla Wall Connector Error Codes (LED Blink Patterns)
The Tesla Wall Connector communicates faults through LED blink patterns rather than digital codes:
| LED Pattern | Meaning | Fix |
|---|---|---|
| 1 blink | Ground fault | Same as all ground fault responses — unplug, check moisture, electrician if persists |
| 2 blinks | High temperature | Allow cooling, check ventilation |
| 3 blinks | Power relay failure | Contact Tesla service — hardware fault |
| 4 blinks | Over/under voltage | Check supply voltage at charger location |
| 5 blinks | WiFi connectivity issue | Reconnect through Tesla app |
| 6 blinks | Ground / earth fault | Same as 1 blink response |
| Red + white | Charger hardware fault | Contact Tesla service |
For Tesla Wall Connector WiFi issues specifically: If the Wall Connector shows offline in the Tesla app, go to the Tesla app → Charging → Wall Connector → Manage → Reconnect. If this doesn’t work, press the button on the Wall Connector unit once — this initiates a connectivity broadcast that the Tesla app detects.
Wallbox Pulsar Plus Error Codes
| LED Colour/Pattern | Meaning | Fix |
|---|---|---|
| Red solid | Fault state | Check Wallbox app for specific code |
| Red flashing (slow) | Communication error | Reconnect vehicle, check pilot signal |
| Red flashing (fast) | Hardware fault | Contact Wallbox support |
| Amber (no charge) | Standby/schedule waiting | Override schedule or wait for window |
| Blue flashing | Updating firmware | Do not interrupt — allow update to complete |
Wallbox app error codes (common):
| Code | Meaning | Fix |
|---|---|---|
| E01 | Internal communication error | Restart charger (power cycle at breaker) |
| E07 | Ground fault | Unplug vehicle, check moisture, electrician if persists |
| E09 | Contactor fault | Contact Wallbox support — internal hardware |
| E16 | Temperature fault | Allow cooling, check ventilation |
| E24 | Pilot signal error | Unplug/replug vehicle, clean connector |
| W01 | WiFi disconnected | Reconnect through Wallbox app |
Wallbox Power Cycle procedure: For persistent Wallbox faults, a full power cycle (rather than just unplugging the vehicle) often resolves firmware glitches:
- Switch off the dedicated circuit breaker in your panel
- Wait 60 seconds (not 30 — Wallbox capacitors take longer to discharge)
- Switch the breaker back on
- Wait 90 seconds for the Wallbox to fully initialise before connecting vehicle
Myenergi Zappi Error Codes
The Zappi displays errors on its small LCD screen using two-digit codes:
| Code | Meaning | Fix |
|---|---|---|
| F1 | Overtemperature | Allow to cool, check ventilation |
| F2 | RCCB fault (residual current) | Check for moisture, unplug vehicle |
| F3 | Pilot fault | Unplug/replug vehicle |
| F5 | Low voltage | Supply voltage below safe range |
| F6 | High voltage | Supply voltage above safe range |
| F8 | CT clamp error | Reposition CT clamp, check CT clamp connection to hub |
| CT — | CT clamp not detected | Check CT clamp wiring to hub |
Zappi-specific Eco/Eco+ mode appearing to not charge: Owners frequently contact Myenergi support about the Zappi “not charging” when in Eco or Eco+ mode. This is almost always the mode functioning correctly — Eco+ will not charge from the grid, only from solar surplus. If there’s no surplus (night time, cloudy day), Eco+ shows no charging. Fix: Switch to Fast mode for immediate grid charging.
Zappi Hub disconnection: If your Zappi shows hub disconnection (hub light not solid green), the scheduled charging through Octopus API will stop working but Fast mode continues. To resolve hub disconnection:
- Check hub power (small light on hub unit)
- Press the hub button once — attempts reconnection
- If hub doesn’t reconnect: Check router settings, try connecting hub via ethernet cable
Ohme Home Pro Error States
| App Status | Meaning | Fix |
|---|---|---|
| Vehicle not detected | Pilot signal failure | Unplug/replug vehicle |
| Network error | API connectivity lost | Check WiFi, check Octopus API status |
| Schedule error | Failed to retrieve Agile prices | Check app for Octopus account connection |
| EVSE fault | Hardware fault in charger | Contact Ohme support |
| RCD fault | Ground fault | Unplug vehicle, check moisture |
Ohme-specific Octopus Agile scheduling issue: If the Ohme Home Pro isn’t scheduling charging around Octopus Agile cheap periods, the most common cause is the Octopus API connection having lapsed. In the Ohme app: Settings → Energy Provider → Reconnect Octopus Account → Re-authorise.
Easee One Error Codes
The Easee One communicates through its LED ring and the Easee app:
| LED Ring Pattern | App Code | Meaning | Fix |
|---|---|---|---|
| Red pulsing | ERR_1 | Internal fault | Power cycle at breaker |
| Red steady | ERR_3 | Ground fault | Unplug vehicle, check moisture |
| Orange steady | ERR_5 | Temperature | Allow cooling |
| White flashing | – | Firmware updating | Do not interrupt |
| No light | – | No power | Check breaker |
Easee Equalizer issues (apartment buildings): If the Easee Equalizer (building load manager) loses connectivity, individual Easee One chargers may default to minimum charging speed (6A/1.4 kW). Check the Equalizer connection to the building’s electrical monitoring point — the CT clamp connection is the most common failure point.
Symptom 7: Connector Problems — Physical Fitting Issues
Connector Won’t Lock Into Vehicle Inlet
Cause options:
- Debris in vehicle charging port
- Damaged locking tab on connector
- Misalignment on insertion
Fix sequence:
- Inspect vehicle charging port for debris — use flashlight, gentle brush if debris visible
- Ensure connector is fully aligned before insertion — don’t force an off-angle connection
- Insert firmly and smoothly — not a jab, a firm push with slight twist to align
- Listen for the mechanical click of the locking tab engaging
- If locking tab is visibly damaged: Connector replacement required — contact manufacturer if under warranty
Connector Difficult to Remove From Vehicle
Common causes:
- Cold weather stiffening the locking mechanism
- Debris in mechanism
- Vehicle’s charging port locking pin engaged (some vehicles lock the connector while charging is active)
Fix:
- Press the release button fully before attempting to pull
- For cold weather stiffness: Warm the connector area with your hand before attempting release (not with heat gun or boiling water)
- If the vehicle is still showing charging active: Stop charging through the car’s app or dashboard before removing connector
- For connector stuck in Tesla port specifically: Use the Tesla app to unlock the charge port before attempting physical removal
Arcing or Burning Smell at Connector
Immediate action: Disconnect immediately if safe to do so — unplug from the vehicle end first. Do not use the charger until a qualified electrician has inspected and diagnosed the fault.
Cause: Arcing at the connector contacts indicates significant contact resistance — typically from corrosion, physical damage, or a connector that’s been repeatedly inserted at an angle. This is a safety issue that requires professional assessment, not DIY troubleshooting.
Symptom 8: Energy Monitoring Showing Incorrect Data
Smart charger energy monitoring is a frequently reported accuracy issue — the kWh shown in the app doesn’t match what the electricity meter shows.
Common Energy Monitoring Inaccuracies
Emporia Pro + Vue: The Vue whole-home energy monitor’s accuracy is approximately ±2-3% for most installations. Larger discrepancies (10%+) typically indicate:
- CT clamp not correctly positioned on the main conductors
- CT clamp installed on wrong phase
- CT clamp partially clamped rather than fully surrounding the conductor
Fix: Check CT clamp positioning — the clamp must fully surround the conductor (not partially open) and be positioned correctly on each phase.
Wallbox Pulsar Plus: The Pulsar Plus’s internal energy monitoring is calibrated to approximately ±1% at rated load but may show higher variance at low charging rates. If monitoring shows significant discrepancy, check the app firmware version — energy monitoring calibration updates are included in some firmware releases.
Myenergi Zappi: CT clamp positioning is critical for accurate solar monitoring. If the Zappi shows incorrect solar generation or grid import data:
- Check CT clamp position on the supply conductor — must be on the correct phase relative to solar inverter connection
- Confirm CT clamp direction — CT clamps have a polarity arrow that must face toward the supply
- In the Myenergi app, check CT clamp configuration settings — confirm the clamp is configured for the correct input (solar vs grid vs load)
When to Stop DIY and Call a Professional
This guide is designed to help EV owners resolve the majority of home EV charger faults without professional involvement. But there are specific circumstances where DIY troubleshooting must stop and a licensed electrician must be called.
Call a licensed electrician when:
- Ground fault / GFCI fault persists after unplug/inspection/dry-out — persistent ground faults indicate wiring, installation, or internal hardware faults that require professional diagnosis
- Circuit breaker trips repeatedly or immediately on reset — persistent breaker trips indicate overcurrent or fault conditions that a professional must diagnose
- Any sign of burning smell, scorching, or physical damage to the charger — damaged electrical equipment is a fire and shock hazard
- Water ingress into the charger housing confirmed — compromised IP protection creates shock risk
- Charger output voltage out of specification — supply or installation problem requiring professional measurement and diagnosis
- Any fault in the wiring between panel and charger — wiring faults are not appropriate for homeowner self-diagnosis
- Post-lightning strike or power surge incidents — surge damage may not be visible but can compromise safety systems
In the UK specifically: Any wiring work on a home EV charger installation is notifiable work under Part P of the Building Regulations — requiring a registered electrician. Don’t attempt to add circuits, replace wiring, or modify the installation yourself.
The Preventive Maintenance Schedule — Preventing Faults Before They Occur
Most of the faults covered in this guide are preventable or detectable early through simple routine maintenance. The annual maintenance checklist from our maintenance guide applies here with specific troubleshooting relevance:
Every 3 months:
- Check WiFi connectivity in app — confirm charger is online
- Check that scheduled charging ran correctly on a recent night — verify actual vs expected SOC each morning
- Visual inspection of connector for debris or moisture ingress
Every 6 months:
- Full connector inspection and cleaning — dielectric grease application
- Cable jacket inspection — look for cracking or stiffening
- App update check — confirm latest firmware and app version
Annually:
- Mounting hardware torque check
- Full cable length inspection
- Pre-winter: cold weather cable flexibility check
- Post-winter: connector contact inspection for corrosion from winter moisture cycles
Internal Links — Further Reading on Clean Energy Bazaar
Troubleshooting home EV chargers common fixes for US and European models is the practical diagnosis guide that connects to the broader ownership guides across this site.
For the long-term maintenance comparison covering Grizzl-E and Wallbox reliability in depth, our EV charger maintenance 2026 brand comparison US Grizzl-E vs Europe Wallbox guide covers every reliability dimension. For the load balancing solutions that prevent the circuit breaker tripping faults covered in Symptom 5, our load balancing EV chargers 2026 guide covers the full picture. For the winter charging guide that explains the cold weather connector issues covered in Symptom 7, our winter EV charging guide 2026 cold weather performance US Northeast vs Europe covers cold weather EV charging in depth. For the IP rating guide that explains water ingress protection relevant to the ground fault scenarios in Symptom 1, our weatherproof EV chargers 2026 IP ratings guide covers every rating honestly. For the smart connectivity guide covering WiFi setup and solar integration troubleshooting relevant to Symptom 4, our best smart connectivity Wi-Fi app solar integration US Emporia vs Europe Zappi guide covers every feature. For the full visual side-by-side comparison of all 15 chargers including the models covered in the error code section, our visual side-by-side 15 top EV chargers 2026 US and Europe compared covers every specification. And for the professional installation guide explaining when charger faults require licensed electrician involvement, our professional EV charger installation costs 2026 guide covers every market.
Final Thoughts
Troubleshooting home EV chargers common fixes for US and European models covers the full diagnostic spectrum — from the five-second schedule override that resolves the most common “not charging” complaint to the ground fault diagnostic that correctly identifies when a licensed electrician is necessary.
The diagnostic priority order for any home EV charger fault:
- Read the indicator light — it tells you immediately whether the fault is a power issue (no light), a standby state (amber), or a genuine fault (red)
- Check the app — smart charger apps provide specific error codes that narrow diagnosis immediately. A fault that shows “schedule waiting” in the app takes 10 seconds to fix. A fault that shows “ground fault detected” takes a completely different response
- Perform the universal reset — unplug, wait 30 seconds, replug. Resolves approximately 30% of reported faults without further intervention
- Follow the symptom-specific diagnosis — use this guide to match your observation to the specific diagnostic path and fix
- Know when to stop — ground faults that persist, breakers that trip immediately, burning smells, and water ingress are all calls to a licensed electrician. The boundary between DIY troubleshooting and professional intervention is clearly defined and worth respecting
The 6:45am discovery problem — low battery, charger in fault state, fifteen minutes to departure — is solvable for most faults in under five minutes with the right diagnostic framework. That’s what this guide provides.